The concept:
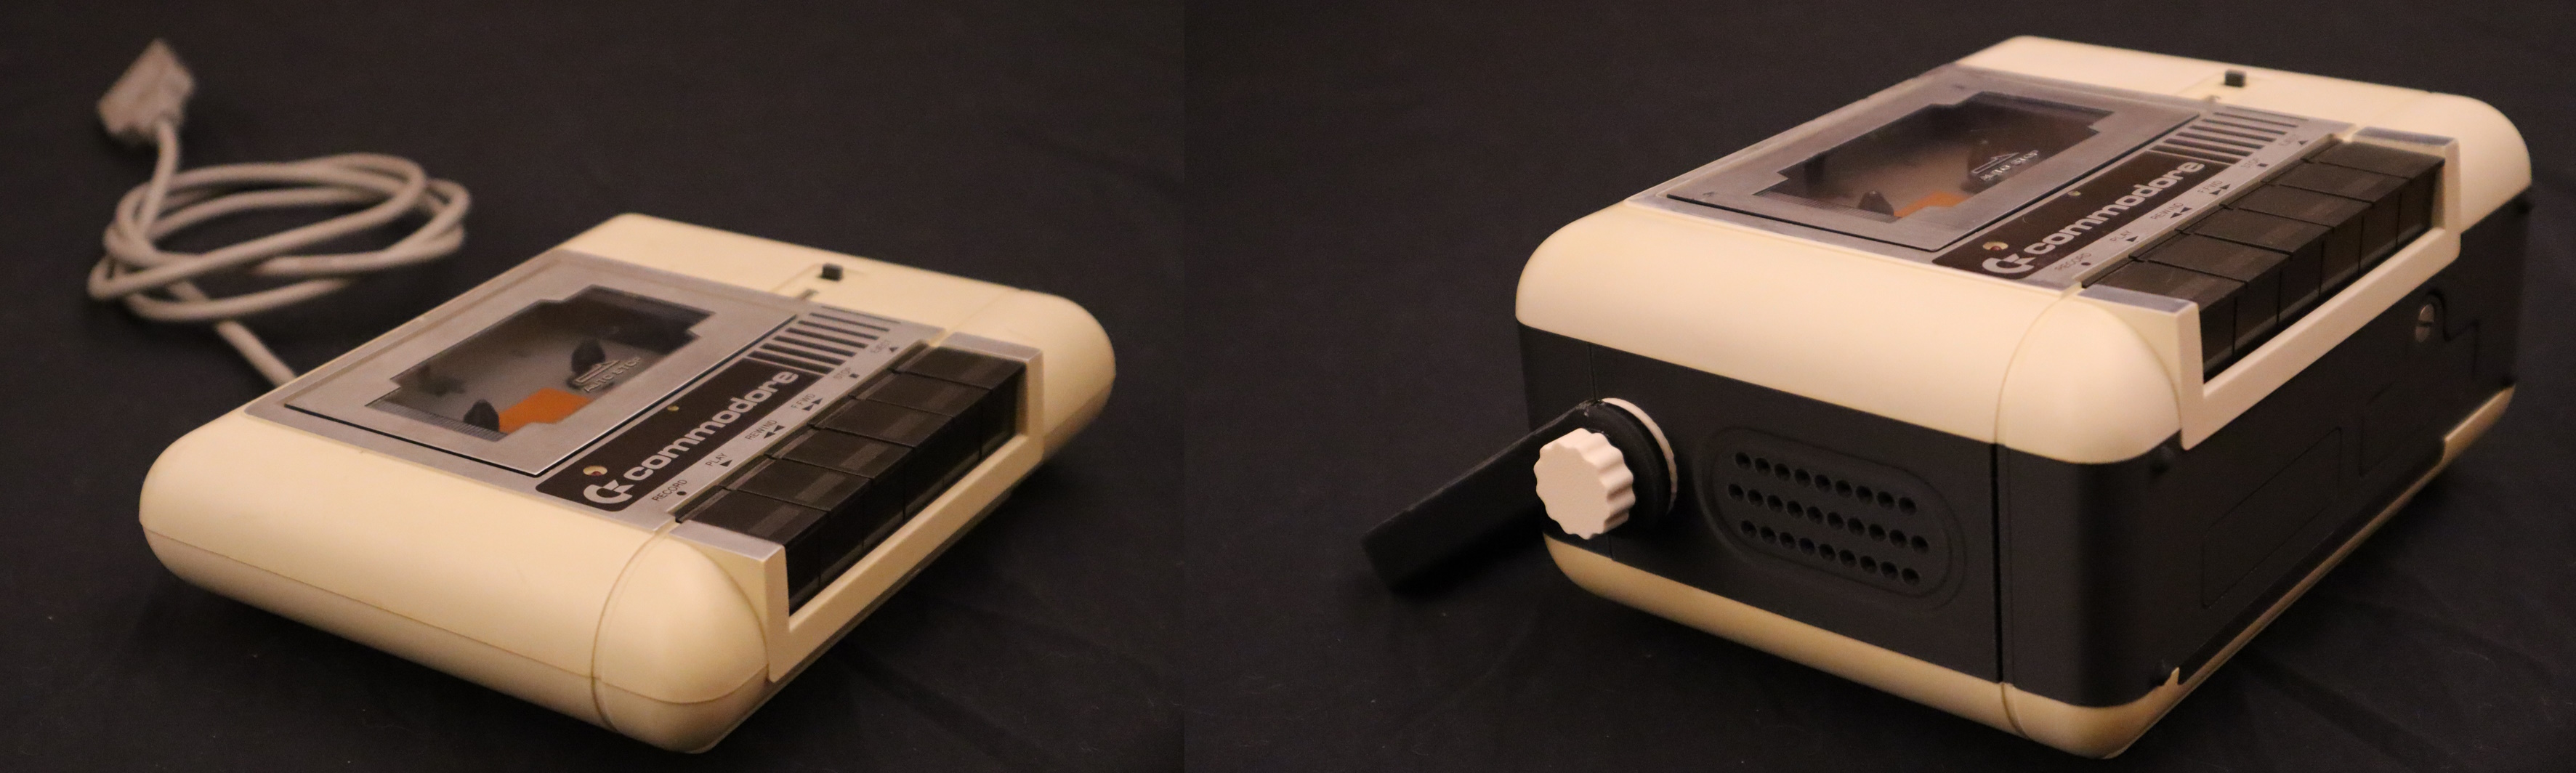
The concept is simple, convert a datasette into a boombox by adding a midsection between the top and bottom part of the datasette case. This midsection will hold the batteries, the amplifier and the speakers and provides a nice "front panel" to hold the additional volume knob. Add a handlebar to make it portable and you're done.
 When looking at the schematic, you'll see that there isn't much to it. The audio signal is taken from the analog part of the existing datasette analog circuitry, which (how convenient) has just the right level to be send to the speaker amplifier.
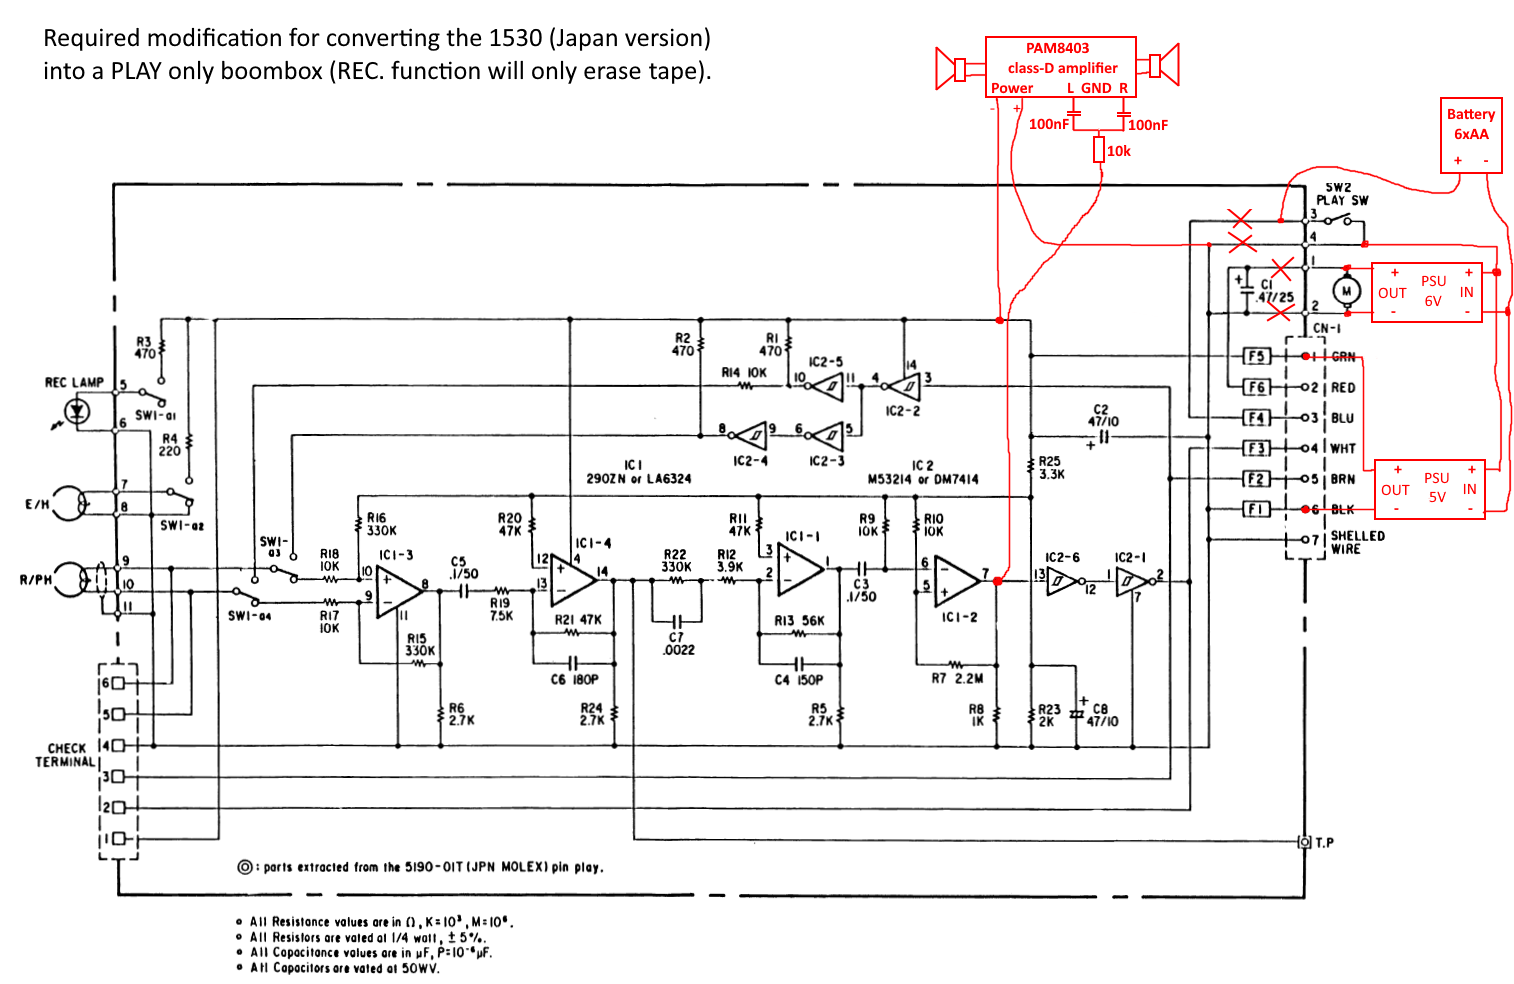 The 1530 boombox does no longer function like a datasette, allowing this functionality would make it way more complicated. First of all the C64 cannot supply the full power for the audio amps and you don't want to use a datasette on batteries. So I decided not to go through the extra trouble of adding switches and circuitry for functionality nobody really cares for anymore. And to be honest, I still have another datasette in case I do want to play a game-tape on my C64. But feel free to build your own version in your own way and if you do, feel free to send me a picture of your build. Oh... and make sure you've remove those write-enable taps from your audio cassette, because the record function is still present, but since you cannot input any signal to record you simply erase the tape. Recording of analog signals isn't possible anyway, the circuitry simply does not provide the electronics for proper analog audio recording (which is more complicated than you'd think). The datasette never needed it, because it uses saturation recording, meaning that the signal was either a max. level positive or negative magnetization of the tape.
My story behind this project...
In this time and age, nobody really has the desire to mess around with this obsolete format and since there are plenty of alternatives, the 1530 datasette does not get an awful lot of love from the members of the retro computing community. Which has resulted in people discarding their datasette. Fortunately I was at the right place when some of these units were disposed of and I took them home, knowing that someday a purpose for them was to be found.
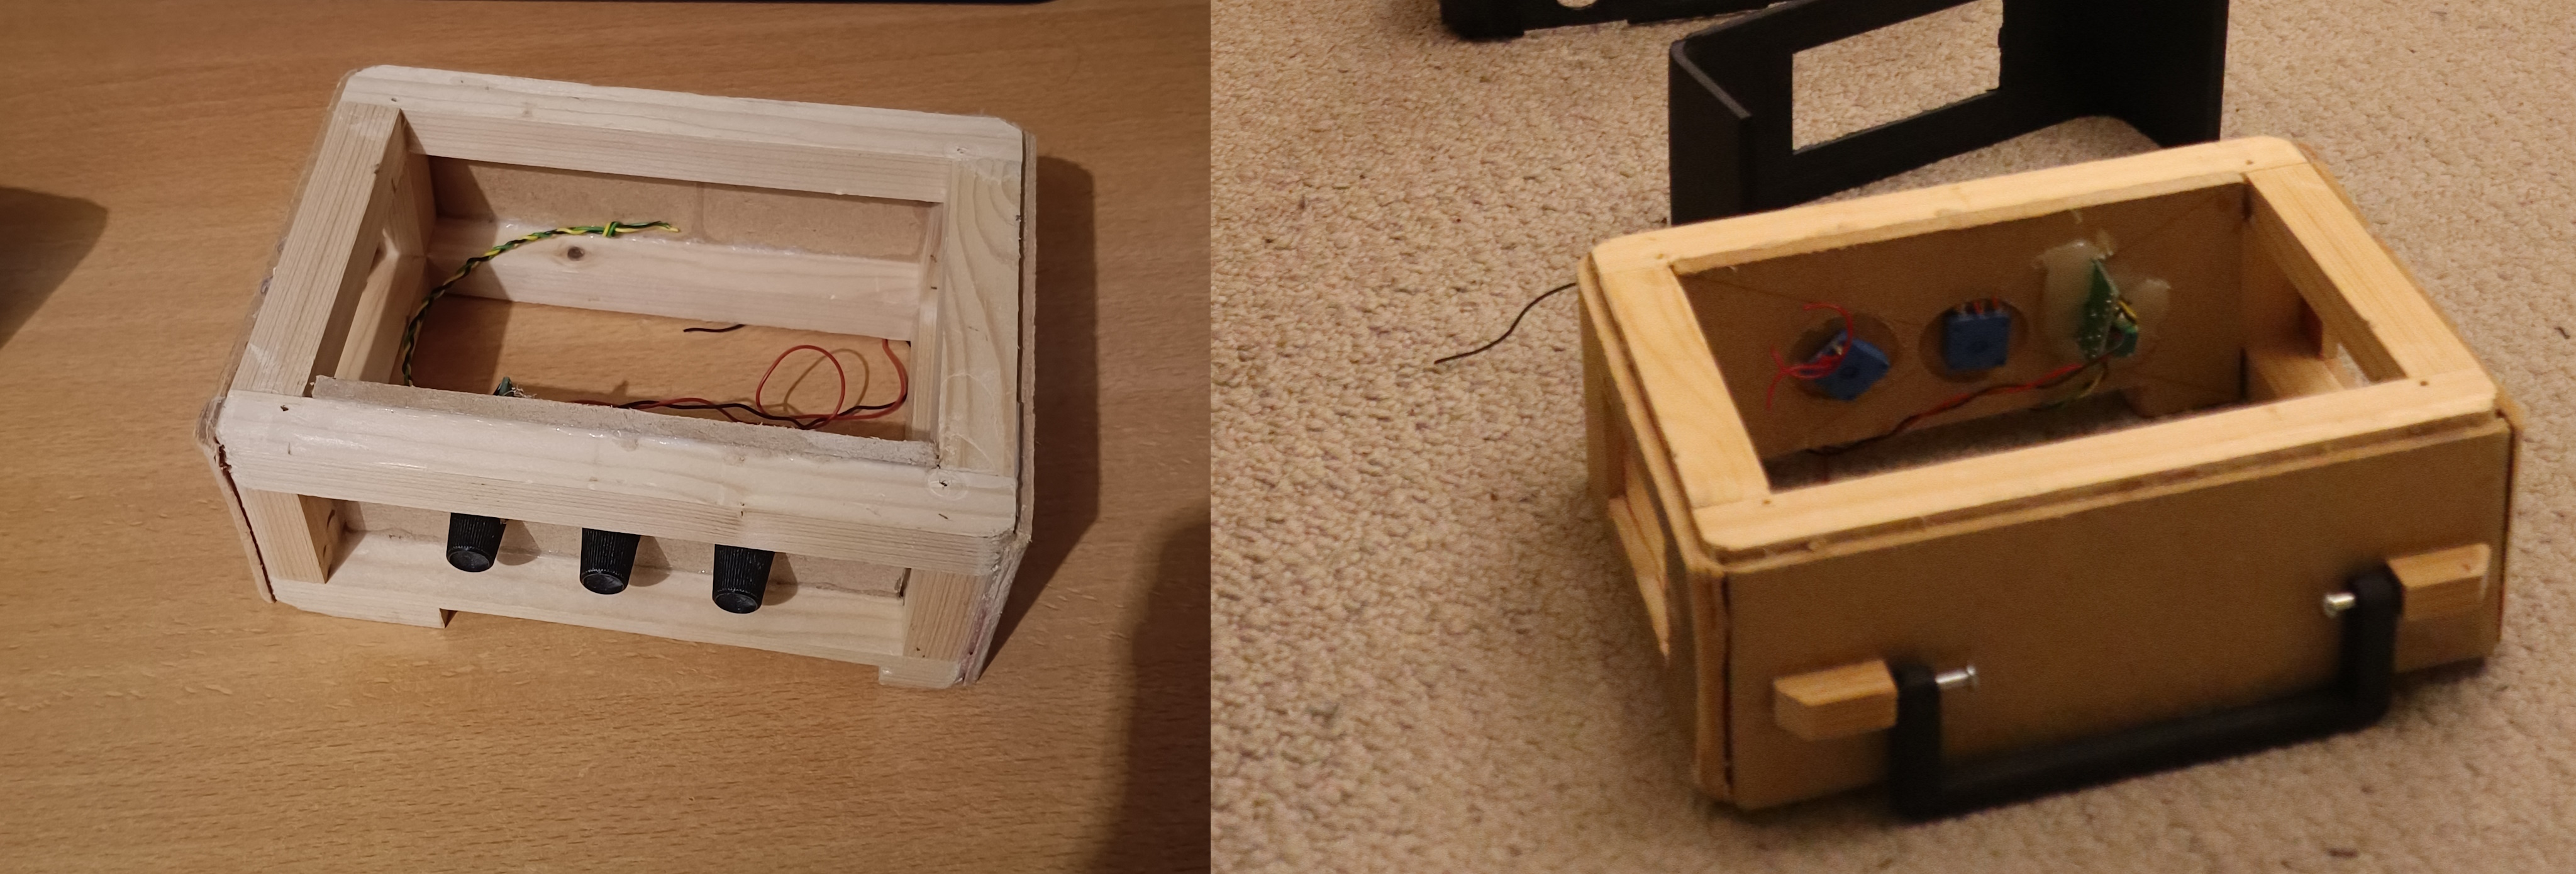
It was somewhere in 2021 when I had the idea of converting one of these units into a boombox, I thought it could be a funny project to do, not to complicated (at least that's what I thought at the time). And which some cheap parts and some scraps of wood I made a crude prototype that I could show to some people, to determine if this was a project worth pursuing, after all, what's the joke if I'm the only one who can laugh about it. And they seemed to like it so I carried on an tried 3D-printing the additional parts in order to add a midsection to the 1530 to create the extra space for the speakers, batteries and amplifier. And I failed... horribly. I just could not get the measurements right and I made the mistake of trying to print it all into one big part. Because my printer was slow and required lot's of attention during printing, it consumed way to much of my time, with no sign of success in sight. So the project stopped...
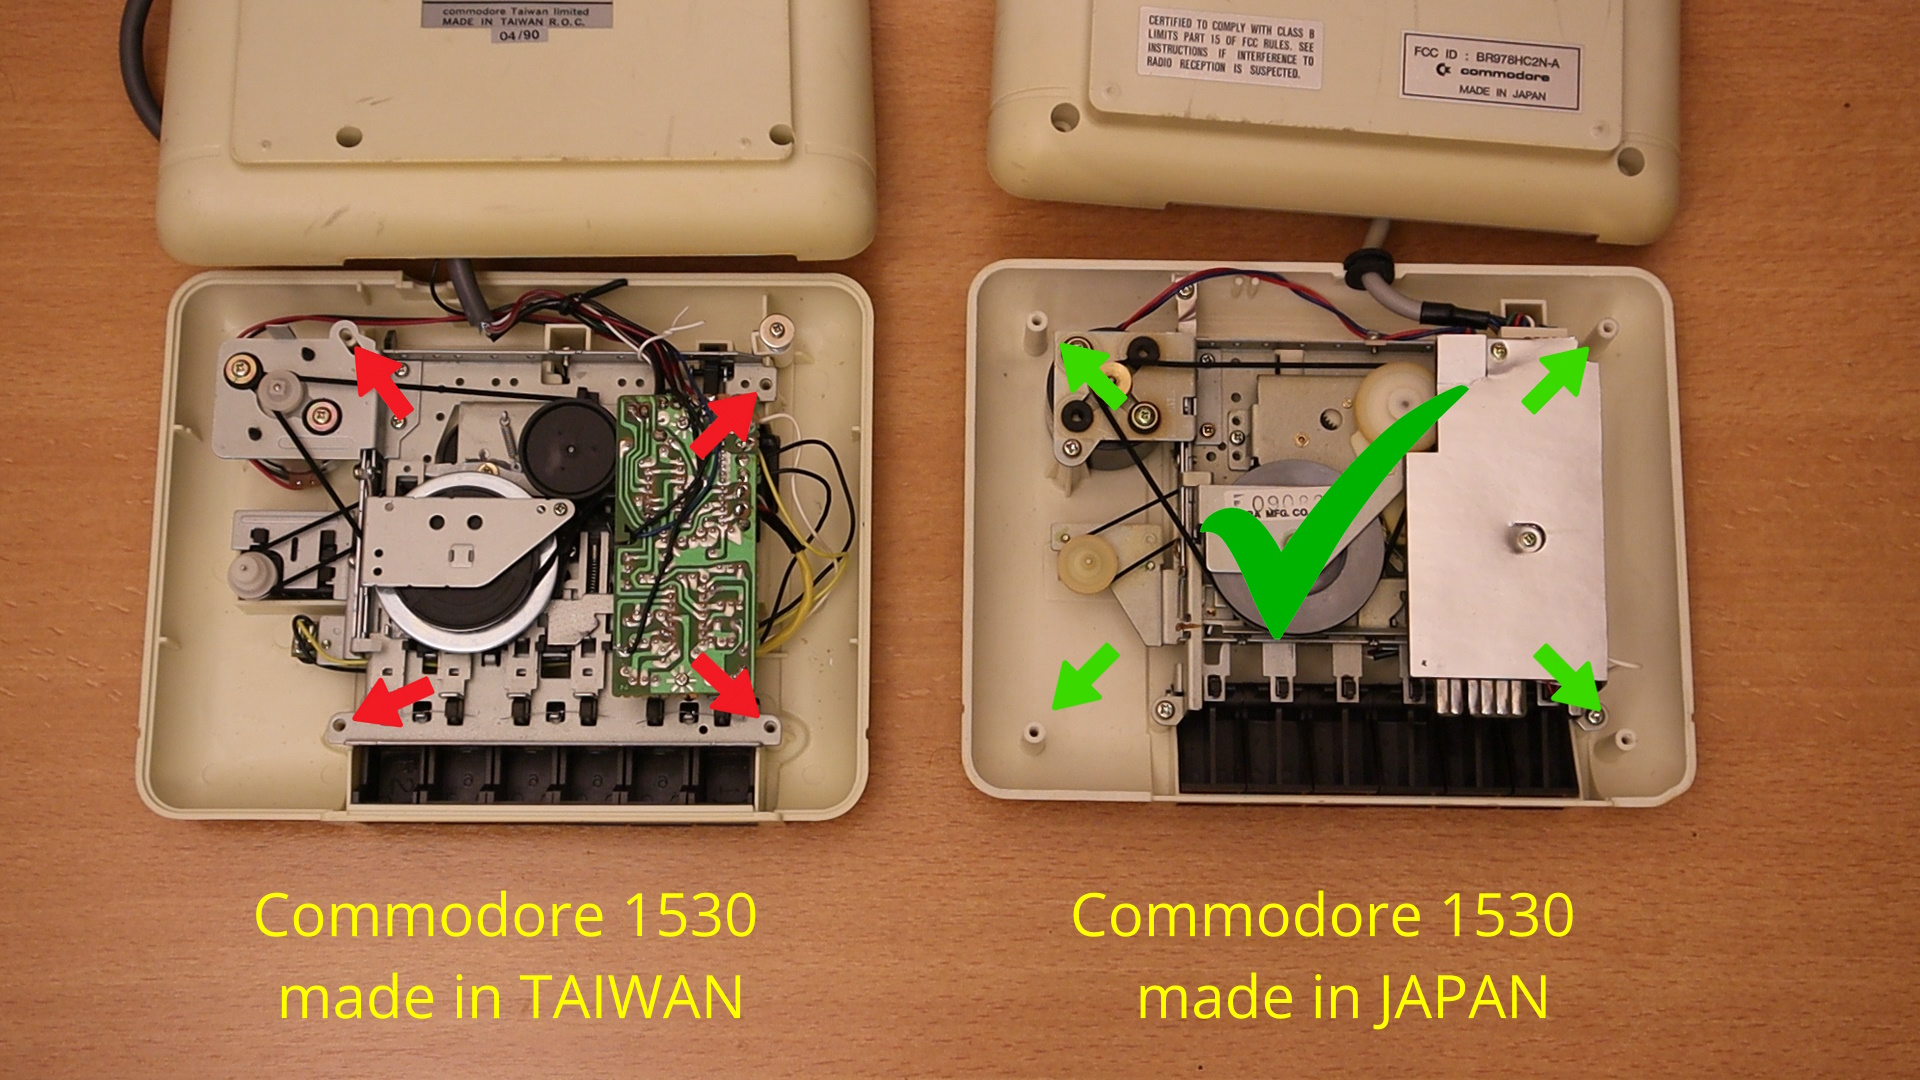
 Years went by, the project and the parts were still in a box where I put them a long time ago. And then suddenly it hit me. At the time I was focusing on the 1530 datasette as made in Taiwan, since that seems to be the most common model these days. But I also had a few 1530 datasette made in Japan. And that model is simply way easier to work with. Because, the Japanese version, uses 4 screw posts to hold the top and bottom halve together. And another 4 screw posts to mount the cassette mechanism in the top part of the datasette. While the Taiwanese version, uses 4 screws post for both functions, sure it saves 4 screws, which saves time and cost during production, but since these screw-posts are at very awkward positions, using them to fix the extra 3D-printed part would be much more complicated. So I decided to focus only on the Japanese version of the datasette to function as my model of choice for this project, after all, It's not that I want to make a lot of these, just one and I have enough datasettes of that type to do so. And if, for whatever reason, somebody else also wants to build their own 1530 datasette boombox, let them find a Japanese version. You can spot them easily, the front has a tiny counter display with a black numbers on white reels, the back has the label "made in Japan" but perhaps more clearly are the symmetrical layout of the screw-holes. Feel free to change my design (see the download section) if you desperately need to convert the Taiwanese version of the datasette. But for now, I made my choice, otherwise this project will never be finished. Spoiler alert, I finished it, it took me about 5 years to get here, but it's done now and I'm pretty happy with the result.
 Knowing on which datasette model I was going to base my design, did not solve my measurement problems. Because back then the project stalled because I could not make a decent shape that was a perfect fit in between the top and bottom halve. My main problem is that my caliper is not big enough and my ruler not accurate enough. Then there are the corners, how do I measure the correct radius and the exact position of the holes. And then it hit me... why not use a flatbed scanner, import the image into FreeCAD as a backdrop and draw my design on top of that. It might take a few tries to get the scaling right, but when that's done I might get this project going. And so it went. I tried some prints, tested the size and made some small modifications until the basic shape fit. And oh... I wasn't going to make the mistake of making one big part, this time I would be making separate parts, one part for each of the 4 sides and assemble them with glue or whatever. As this would allow me to make a small change to one of the 4 sections without needing to print one big parts over and over again. This should speed up design iterations significantly. And as you might expect... things aren't right the first time... since my printer still was slow. A simple model I build from scratch 10 years ago I decided that it might be just the right moment to buy a 3D printer. After all, technology has advanced, prices dropped enormously the past decade, I thought of all the time it would save me... I deserve this... etc. so I talked myself into buying a new printer. And that was the best decision I made in a long time, I bought the Elegoo Centauri Carbon (a.k.a. CC1). This machine exceeded my expectations, at the moment of writing I have 160 Hours of printing on it (of which have of it is spend on this boombox project) it never failed me once. The reason I printed so much is, well... prototypes aren't right the first time, lot's of tinkering to get things right, lot's of tinkering to determine what you really want, so lot's of printing the same part with slight modifications over and over again.
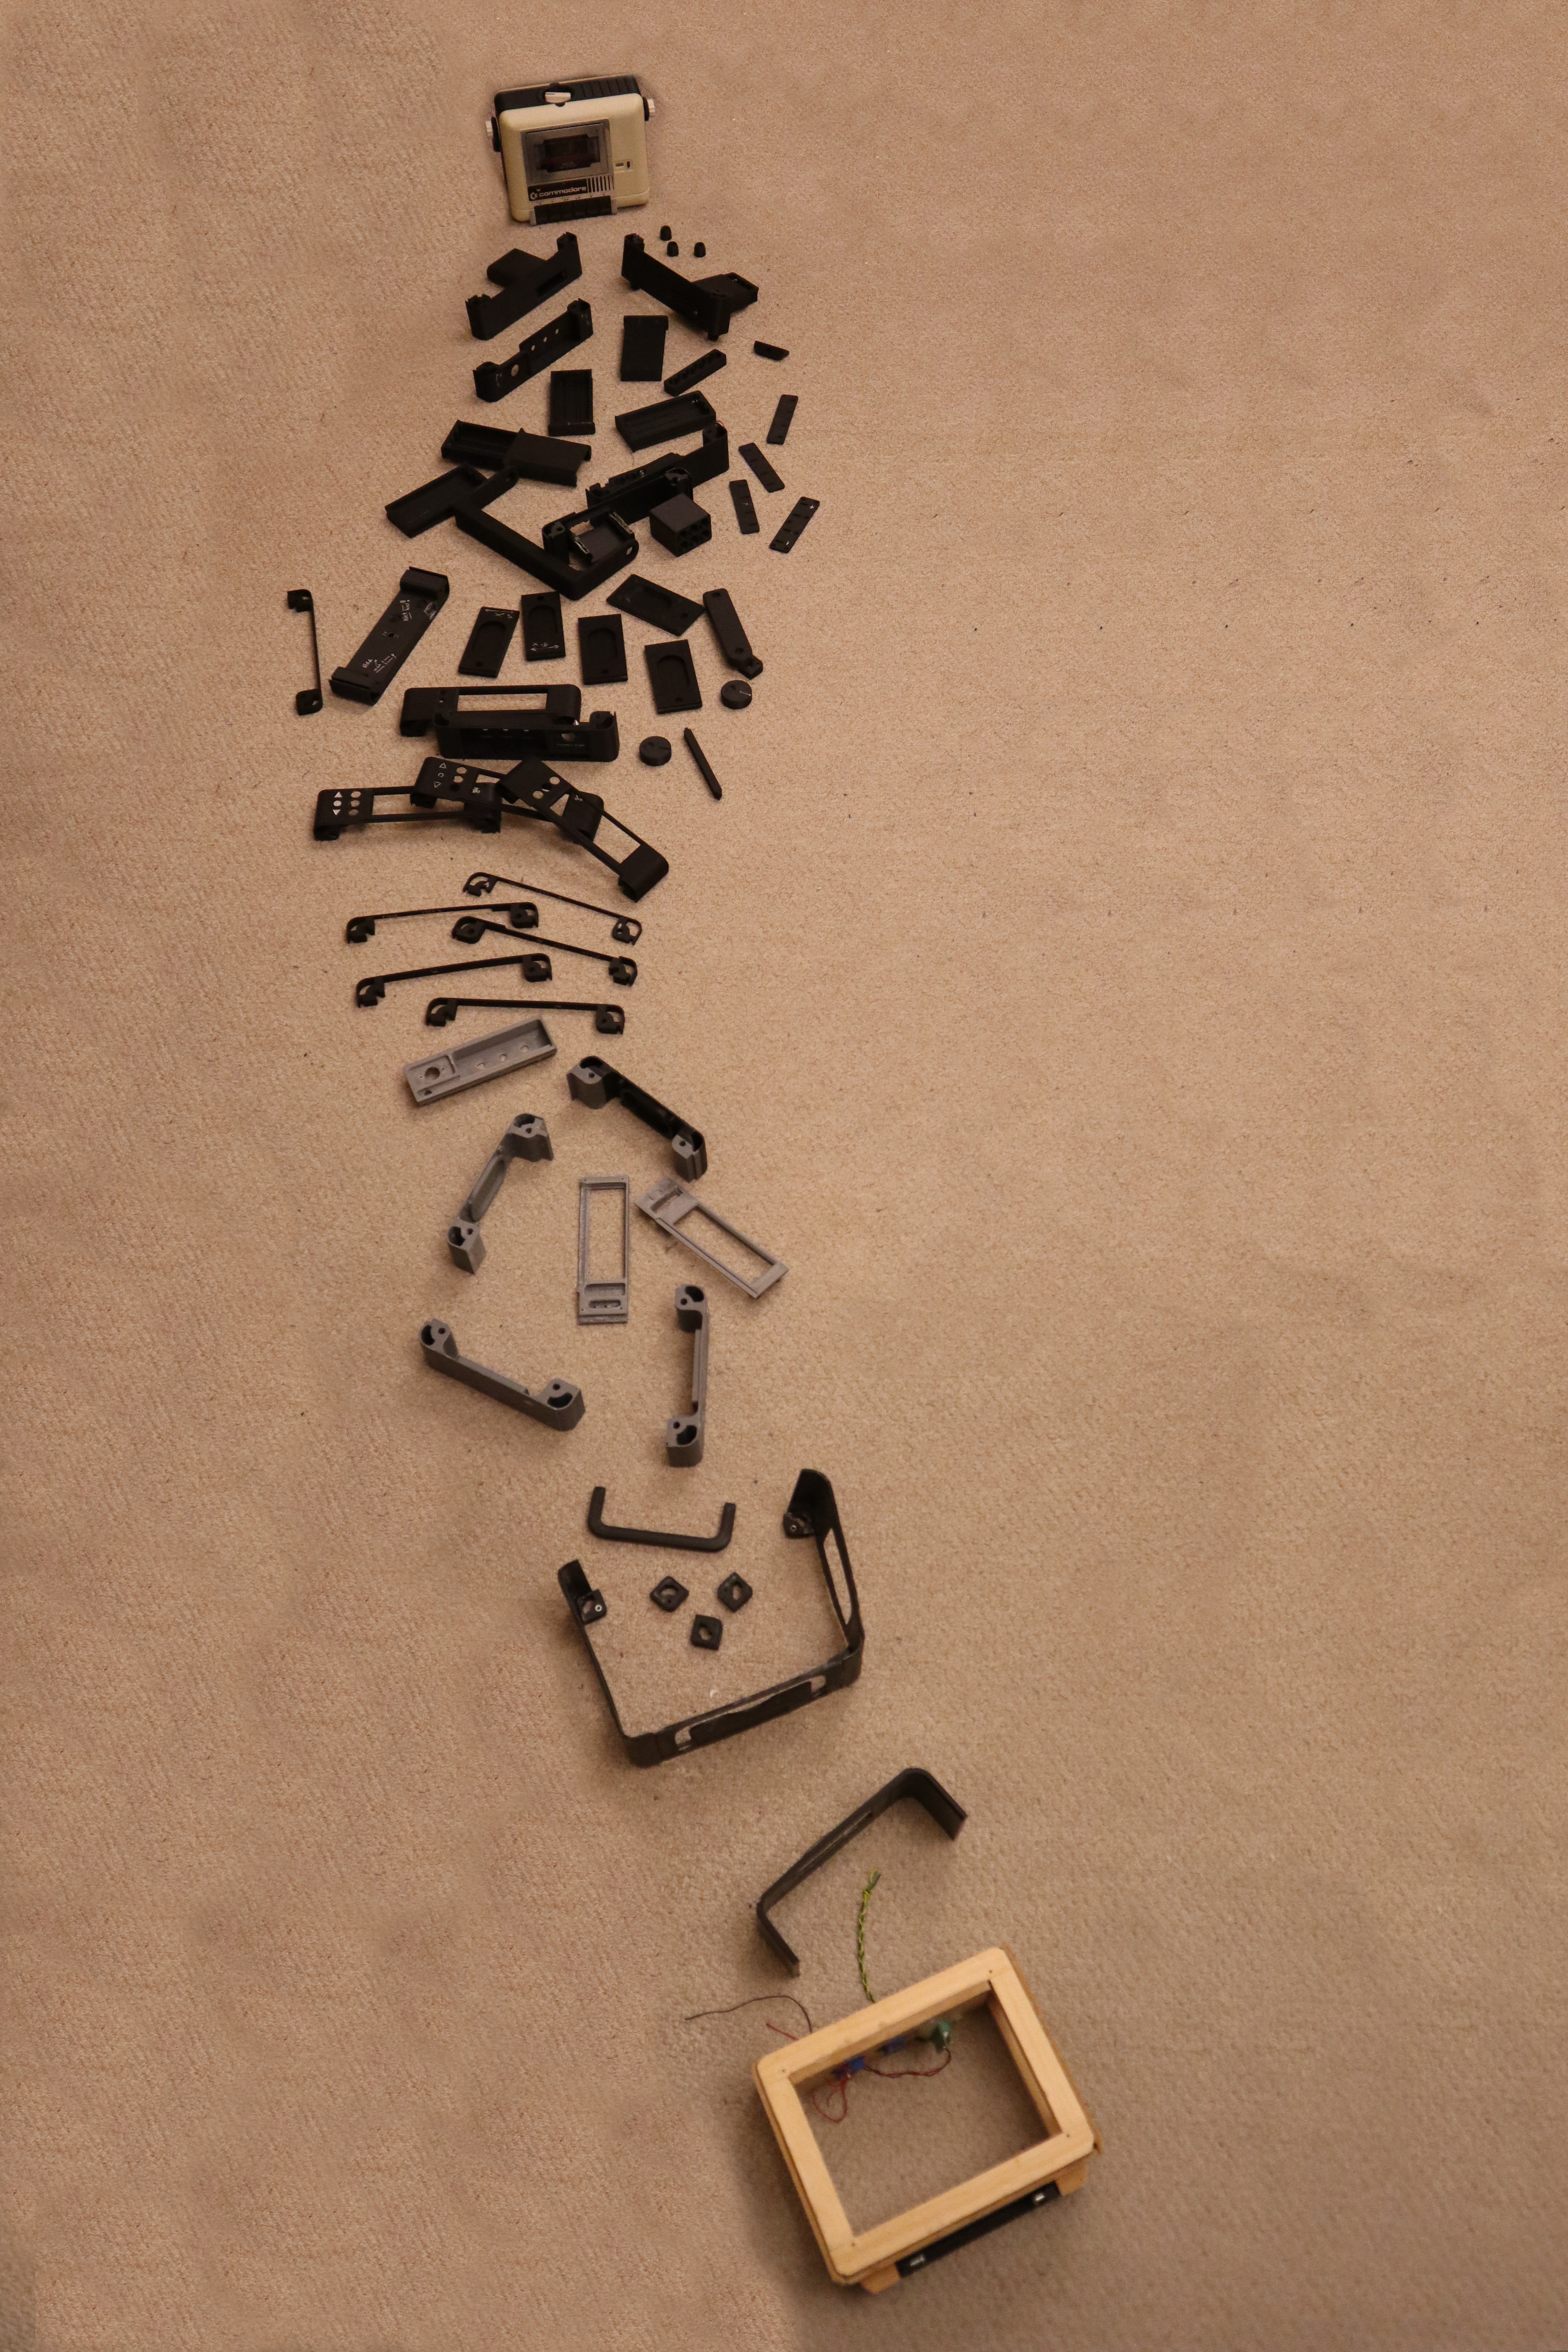
Anyway, with this new printer, 3D printing became much easier, quicker, almost fun, which resulted in allowing me to quicker iterate the design into something that actually worked and looked nice. To get an idea of the work behind "getting the design just right" I put all the print of wrong design decision in a row. Starting at the bottom with the wooden prototype and ending at the top with the finished result. When you look closely, so see the moment where I got the new 3D printer.
Power source:
The 1980's boombox could play very loud and required a lot of big batteries in order to operate. That was back then, now in 2026 we still can use batteries but we just don't require as many for the same functionality. One of the reasons is that audio amplifiers have become much more efficient. The 1530 boombox requires only 6 AA batteries and depending on the volume can play for a very long time, don't ask me how long, I'm still on my first set of batteries. Ordinary AA batteries can not be recharged, but that is not a problem since I do not expect to use it that often and it's very easy to replace when the are empty. If this project was to use rechargeable batteries it would make the project much more complicated as that would require a charging port, special cable, special charger and some extra circuit(s) to prevent (dis)charging problems. And if the wrong kind of cell was to be used in the wrong way it could end up being a potential fire hazard. By using ordinary AA batteries the whole design is 100% safe and very simple.
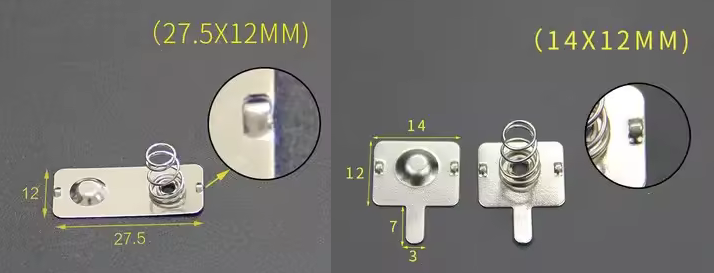
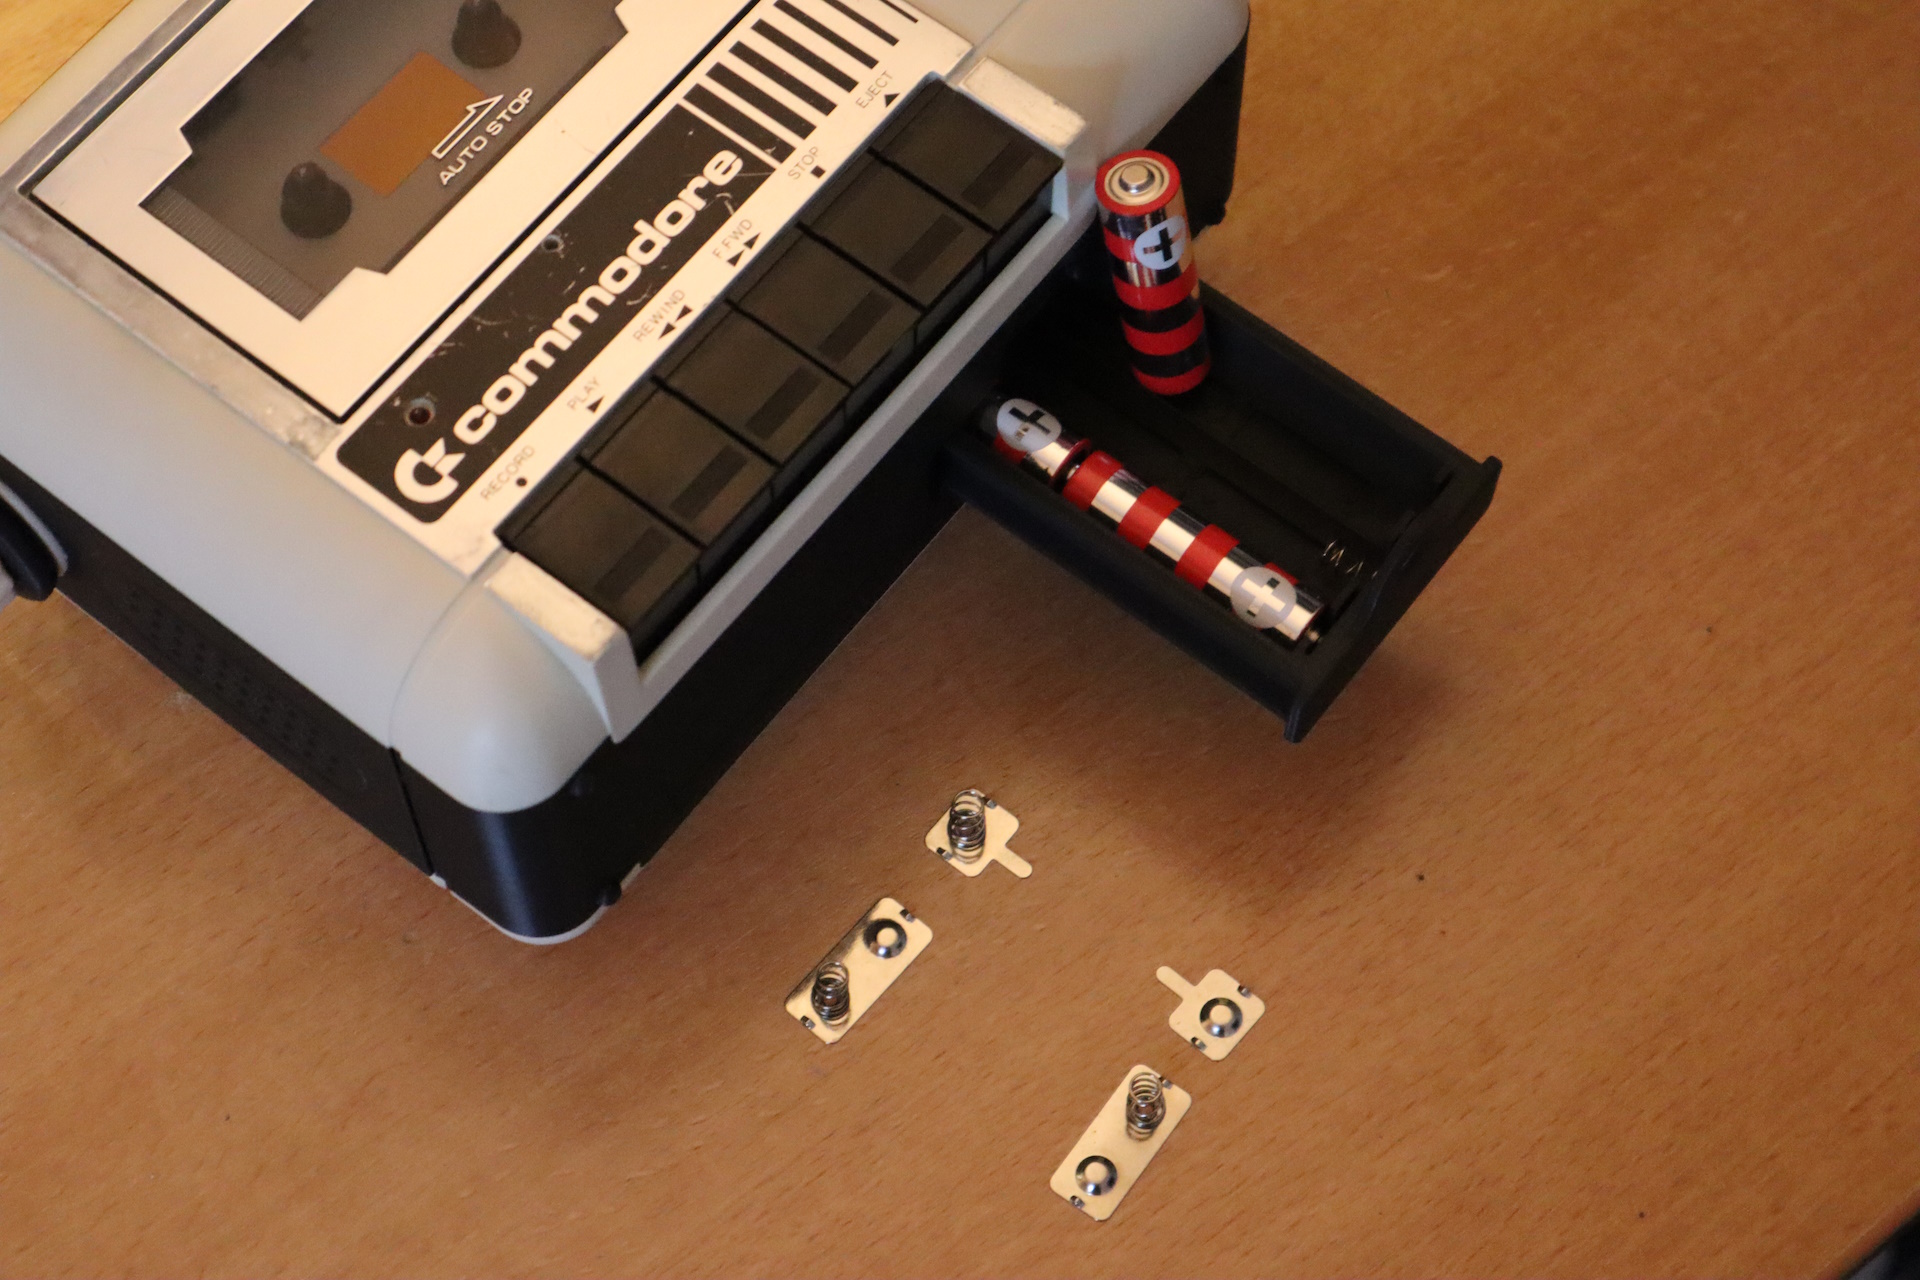 Battery-springs can be bought from the usual Chinese discount locations, pay close attention, there are many shapes and sizes that all look alike but are slightly different. Here you see an image of the ones that I used for this project.
 The battery voltage is stepped down using a DC:DC converter to a voltage of 5V for the audio amplifier and analog electronics. And using another DC:DC converter for the motor voltage. Unfortunately, there is no shortcut here. At first I thought that 5V was enough for the motor to spin, which is true for the datasette made in Taiwan, but it isn't for the made in Japan version. This because they are entirely different motors with an entirely different method of controlling the speed. Where the Taiwan version uses an electronic speed regulation method, by sensing the back EMF voltage, the Japan version uses a mechanical speed control, using a governor build into the motor. this requires just a little bit of extra voltage to run properly, running it at a slightly lower voltage will result in a very unreliable and nasty sounding speed regulation, you do no want that, seriously! So we cannot run the motor at a voltage lower then 6V. But can we run the electronics for the analog amplifier and the speaker amplifier at a higher voltage... no, not at 6V, it will fry the speaker amplifiers or cause them to go into their over-temperature protection mode, causing the sound the cut off at the most unexpected moments. So in the end we'll be needing two DC:DC converters, fortunately these things are cheap when bought from the usual Chinese discount locations. Before installing them into your build, make sure they are already set to the proper voltage in order to prevent damage. Because on default they are usually set to voltage that is way higher then needed!
Oops:
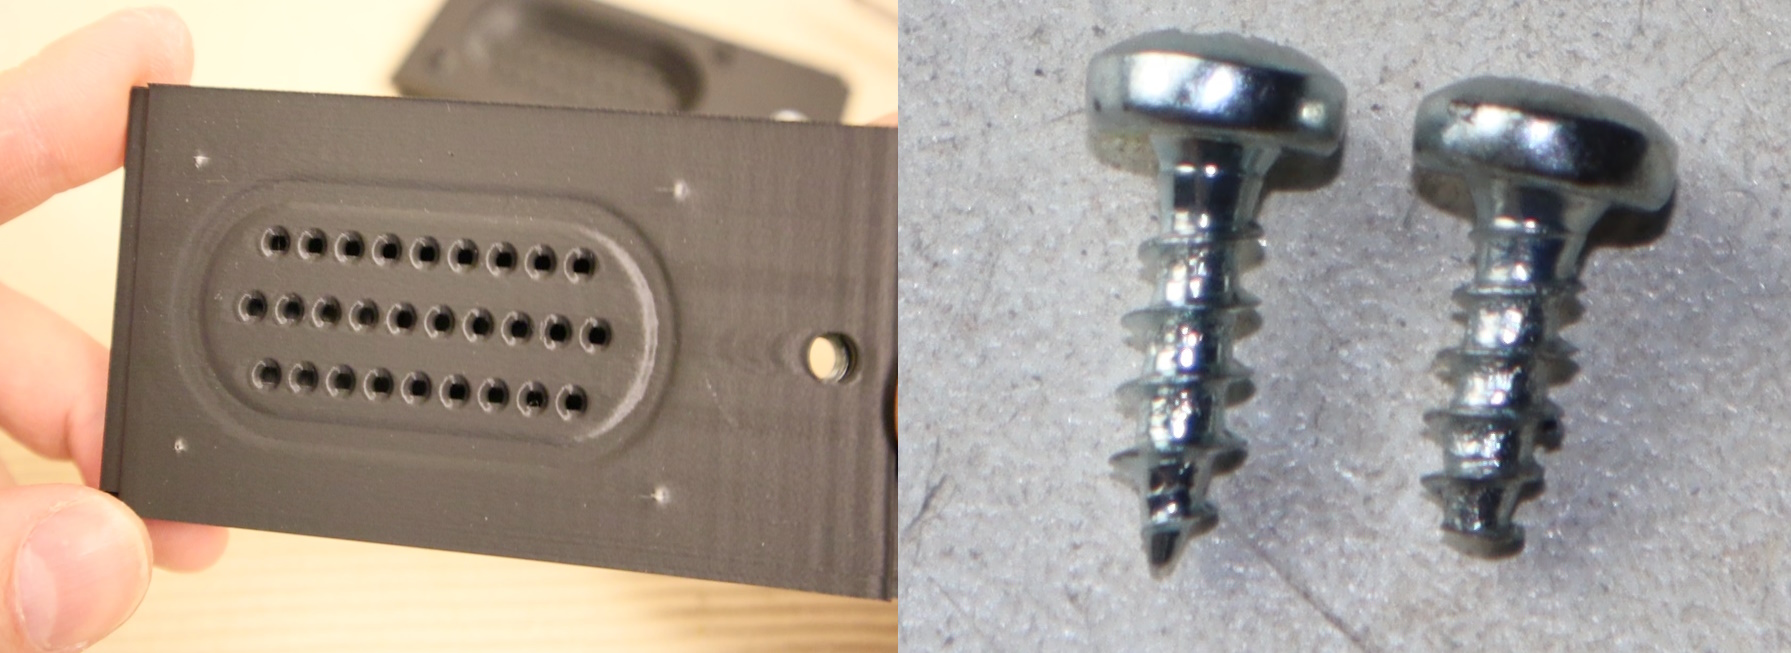
When I made the prototype, I used some screws I had lying around, they were the perfect length. Then when I wanted to assemble the final version for the video, I bought some new screws at the hardware store, I misjudged the length of these screws, so you've guessed it, they were just a tiny bit too long. Causing the screws to come out of the other side... almost. But enough to ruin the looks. I tried saving the part, but the damage remained visible. Since reprinting didn't take too long, I printed that part again. And since the hardware store didn't have any shorter screws of that size, I shortened them myself.
Does it work:
Sure it does. Just insert some batteries, a tape and press play. A more appropriate question would be, how often do you use it. That is a bit more complicated, because technically, I do not play a lot of tapes any more. I still have my entire tape collection of mix tapes from my youth and most of the songs are from the 90's and that wasn't a decade of music that needs to be repeated on a regular basis. And to be honest, I still have a normal tape deck too. It's mostly a fun little gadget to bring to meetings. And although 2x 3Watt is quite deafening in the living room it doesn't seem like a lot in a large and crowded space. There is also one thing to keep in mind, the datasette is a mono device and although it has two speakers, both are playing the same mono sound. Converting the datasette into stereo isn't impossible, just change the mono tape head for a stereo version and replace the analog amplifier mono stage for a stereo stage. But that would make it all much more complicated for something most people aren't even able to hear (unless they are told). Another reason to keep things simple, is that the build can be easily reversed, so if somewhere in the future I would like to restore the functionality of my datasette boombox into a datasette, this can be done by ripping out the added parts, put back the cable and everything will be fine.
Parts used:
The total printing time is about 10 hours and requires about 290 grams filament (this value is highly dependent on your 3D slicer settings regarding infill and support. I'm using the Elegoo slicer for the Centauri Carbon printer with the default settings which has an infill setting of 15%. Now this project is not about 3D printing alone, you'll actually needs some other components too. Here is a short list of the parts I used:
5x self tapping screw or sheet metal screw about 3mm thick and 7mm long
3x M5 nut
2x M5x20mm bolt
1x M5x8mm countersunk screw
2x 4070 Loud speaker, 4 Ohm / 3 Watt
2x LM2596S-ADJ DC:DC converters
1x PAM 8403 class D (2x 3 Watt) audio amplifier (choose the module with the volume potentiometer)
1x resistor 10k
2x 100nF
2x battery spring 27.5x12mm
1x set of battery-spring 14x12mm
6 AA batteries
a handful of electrical wire in appropriate colors (for example: red, black and yellow.)
glue, solder, a paint marker black
Tip: a chrome paint marker could come in handy if your datasette is heavily scratched and needs some reworking, do not use too much
Then there is the obvious, but I mention it anyway, make sure your datasette is in good working condition:
a set of new drive-belts for the datasette
cotton swaps and alcohol for head/roller/capstan cleaning
a piece of ordinary paper to clean the leaf contact that closes when play is pressed
contact cleaner to clean the slide switch that moves when record is pressed
Downloads:
If you want to convert your 1530 datasette into an adorable little boombox then here are the design files you'll need to 3D print and the schematic regarding the wiring that needs to be done. If you'll want to modify the design, feel free to do so, the FreeCAD design files are available for download below.
The 3D printed part files : 3D_printed_parts.zip
The schematic : schematic.png